Mapping FMARS EVAs
In addition to my seismic and electromagnetic projects, I made other significant contributions to the FMARS 2009 mission, including creating our mission patch and all of our EVA maps. In this post, I'll describe the maps. These are more more than mere geographic illustrations since they include georeferenced photos, heart rate and other information. My main goal was to integrate geotagged photos and GPS tracks within the geographic context of Google Earth to help the interested public share in our experiences.
To accomplish this, one first needs geotagged photos. Last year, Wired Magazine had a good article introducing the concept, and an Outdoor Photography article summarized the concept nicely:
Several photo-sharing services like Flickr, Picasa, Locr, Panoramio, EveryTrail, and iPhoto Places allow users to manually select the geographic position of each photo on a map or upload already geotagged photos. An excellent review of some of these and tutorial to GPS tagging is here. Manually geotagging photos is a tedious task that quickly becomes intractable with more than a few photos, so automating the process was a requirement for me. There are two main ways to automatically geotag photos:

The following three paragraphs with blue text dive into alternatives to having an automatic geotagging camera. You can skip past this part if you want.
This GPS functionality can be added to SLR cameras too. For example, Solmeta offers three models of its Geotagger hotshoe accessory that work in a number of SLR cameras from different brands. These even work indoors and have built-in compasses for telling you which direction you were facing when you took a photo. The Nikon GP-1 is a similar accessory that adds geotagging capability to most Nikon SLRs for about $210. Another interesting product is the Garmin Oregon 550, which combines a GPS, PDA, camera, altimeter, and compass all in one rugged waterproof device. It could be a really handy field information management tool worthy of testing at FMARS, but its camera features are too lightweight for high-quality results (only 3.2 megapixel with 4x digital zoom), so I opted not to pursue it.
If you use a camera with an integrated GPS or one of these hotshoe accessories, the camera should automatically write the latitude and longitude information into the photos' metadata. The other way to accomplish the same thing is to sync a GPS track taken with an external GPS with your photos. Photographers have used this trick for years, typically with GPS data loggers, which are small film-caniser-sized devices that continuously record GPS position and time. By comparing when a photo was taken with the position recorded by the GPS data logger, one can figure out where a picture was taken. Luckily, there are a number of software packages to make this relatively easy: GPicSync (Win/Mac/Linux), GPSPhotoLinker (Mac), or GeoSetter (Win). As long as the user is diligent about making sure the camera and data logger clocks are synced before starting the photography session, this process works well.
There are many GPS data loggers on the market. The Amod AGL3080 ($61) or GiSteQ PhotoTrackr CD111 ($84) might be the best ones since they're Windows- and Mac-compatible and aren't too expensive. More models are reviewed here. You can even use an iPhone as a GPS datalogger with one of several apps: 1, 2, 3. An alternative to using GPS to geotag photos is the Eye-Fi Explore Video or Pro SD card, but you have to be within a wi-fi network - definitely not an option in remote places like Devon Island.
But I digress... I was supposed to be telling you how I made our FMARS EVA maps.
If you'd had enough techno babble and just want to sit back and enjoy a good show, check out this Google Earth tour of Hawaii, complete with music. You can even pretend to be a ship captain piloting a barge or cruise ship on any river or ocean here. These showcase some of the fun capabilities of Google Ocean.
To accomplish this, one first needs geotagged photos. Last year, Wired Magazine had a good article introducing the concept, and an Outdoor Photography article summarized the concept nicely:
Geotagging is a way to add location or GPS data to your photos to help you organize, search, find and share your images. In the past, it was difficult for even the most advanced photographers to geotag images. There was a patchwork of technology that could do it, but it was by no means easy. Recent technology has taken geotagging mainstream, making it accessible to all photographers.
Several photo-sharing services like Flickr, Picasa, Locr, Panoramio, EveryTrail, and iPhoto Places allow users to manually select the geographic position of each photo on a map or upload already geotagged photos. An excellent review of some of these and tutorial to GPS tagging is here. Manually geotagging photos is a tedious task that quickly becomes intractable with more than a few photos, so automating the process was a requirement for me. There are two main ways to automatically geotag photos:
- directly with GPS-enabled cameras
- indirectly with GPS data loggers plus software
The following three paragraphs with blue text dive into alternatives to having an automatic geotagging camera. You can skip past this part if you want.
This GPS functionality can be added to SLR cameras too. For example, Solmeta offers three models of its Geotagger hotshoe accessory that work in a number of SLR cameras from different brands. These even work indoors and have built-in compasses for telling you which direction you were facing when you took a photo. The Nikon GP-1 is a similar accessory that adds geotagging capability to most Nikon SLRs for about $210. Another interesting product is the Garmin Oregon 550, which combines a GPS, PDA, camera, altimeter, and compass all in one rugged waterproof device. It could be a really handy field information management tool worthy of testing at FMARS, but its camera features are too lightweight for high-quality results (only 3.2 megapixel with 4x digital zoom), so I opted not to pursue it.
If you use a camera with an integrated GPS or one of these hotshoe accessories, the camera should automatically write the latitude and longitude information into the photos' metadata. The other way to accomplish the same thing is to sync a GPS track taken with an external GPS with your photos. Photographers have used this trick for years, typically with GPS data loggers, which are small film-caniser-sized devices that continuously record GPS position and time. By comparing when a photo was taken with the position recorded by the GPS data logger, one can figure out where a picture was taken. Luckily, there are a number of software packages to make this relatively easy: GPicSync (Win/Mac/Linux), GPSPhotoLinker (Mac), or GeoSetter (Win). As long as the user is diligent about making sure the camera and data logger clocks are synced before starting the photography session, this process works well.
There are many GPS data loggers on the market. The Amod AGL3080 ($61) or GiSteQ PhotoTrackr CD111 ($84) might be the best ones since they're Windows- and Mac-compatible and aren't too expensive. More models are reviewed here. You can even use an iPhone as a GPS datalogger with one of several apps: 1, 2, 3. An alternative to using GPS to geotag photos is the Eye-Fi Explore Video or Pro SD card, but you have to be within a wi-fi network - definitely not an option in remote places like Devon Island.
But I digress... I was supposed to be telling you how I made our FMARS EVA maps.
- Get GPS Track of the EVA and make KML file.
Almost all modern GPS devices automatically record GPS tracks, which can be downloaded into a computer for viewing in a number of mapping applications. Since Google Earth speaks KML, my goal was to convert the GPS tracks into that format, although Google Earth can also import GPX files too. On every EVA, I made sure someone wore my Garmin Forerunner 305. A member of the popular Forerunner series, this GPS wristwatch makes it easy for runners to track speed, distance, time, and heart rate in real time during the activity. After, each EVA, I uploaded the Forerunner data to Garmin Connect, which is a nice service that allows for visualizing the data in great detail. One feature of Garmin Connect is exporting the GPS track to a KML file; that's what I did for the FMARS EVAs. If we had instead opted to use a handheld GPS instead of the Forerunner, I would have used an application like GPSBabel (Win/Mac/Linux) or GPS Visualizer (web) to convert GPS track files of varying formats into a format Google Earth knows like KML. Click here to see a movie showing Garmin Connect play back the EVA 9 data.
- Get geotagged photos and make KMZ file.
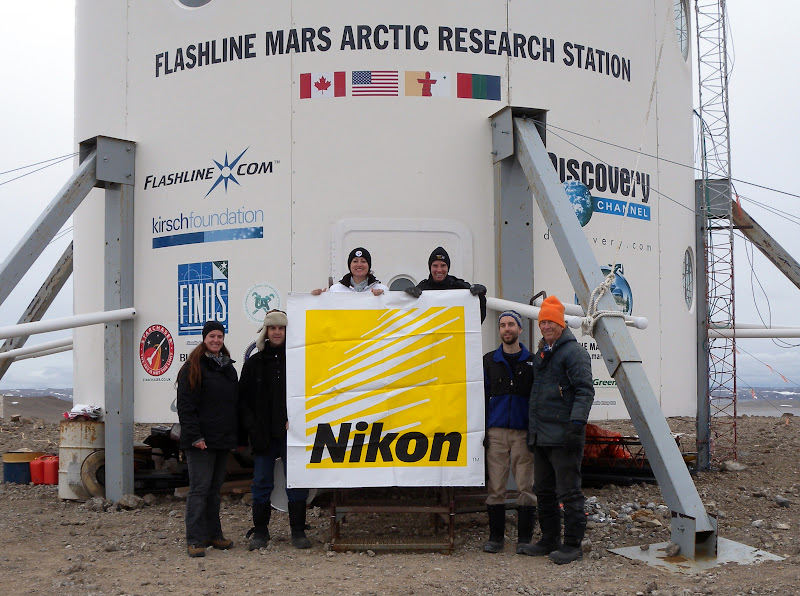
For us, this was easy since Nikon generously donated some Coolpix P6000 cameras. The cameras' GPS function worked well, provided we waited long enough for the camera to get a GPS satellite lock before taking a picture, which would take at least a minute or two after turning on the camera. The GPS receiver itself in the P6000 seems to be kind of weak since it needs a very clear view of the sky to work well. The camera functionality and photo quality are pretty good--not stellar--but good enough. The impressive 13.5 megapixel resolution makes up for the small 4x zoom since it leaves plenty of room for cropping photos. Like most things, operating the cameras in-sim wearing spacesuit gloves was a challenge. If we hadn't been able to get the Nikon cameras, we would have purchased some GPS data loggers and used software to geotag the photos like I described above.
The next step is making a KML file with the photos. Google has a good tutorial on how to do this using Picasa and/or GPicSync. Since we already had a FMARS Picasa Web Albums account, this seemed like the easiest way to go, even though other services like EveryTrail might be better. All I had to do was create an album for each EVA in either the Picasa desktop application or on our Picasa Web Albums site. Then, I selected the "View in Google Earth" option to generate the KML file. Note that from Picasa Web Albums, the filename is just a long numeric string that you have to rename to something more useful, including the .kml extension. There are many other ways to generate KML of photos, including the free GPicSync and not free Geophoto, but Picasa worked for me.
- Combine in Google Earth to make a KMZ file and upload.
This part is easy. Just open the GPS track and geotagged photos KML files in Google Earth, drag them and any related placemarks to a common Folder under "My Places", and then save that folder by selecting "Save" -> "Save Place As" from the "File" menu. In the resulting window, choose the KMZ format (a zipped version of KML that theoretically takes up less disk space), and give it a file name.
The FMARS Mission Support team would post the KMZ files for each EVA to the FMARS website. They would also make an embedded Google Map for each EVA Report webpage using Google's "Embedded KML Viewer" Here is an example of one of those embedded Google Maps for EVA 15, which was the EVA where I removed the seismic station.
- Make EVA summary image.
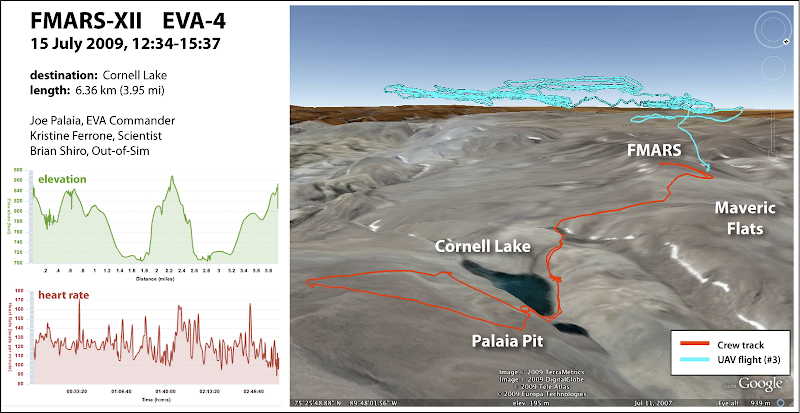
Each EVA report had an image summarizing the trek's main information. To make an EVA image, I would first take a Google Earth screenshot of the GPS track in a 3D perspective view that I liked (with terrain turned and elevation exaggeration set to 3). Then I'd take screenshots of elevation and heart rate charts from Garmin Connect. In Adobe Illustrator, I combined these along with some basic EVA information like the duration, location, and participants to save the result as an image that nicely summarized the EVA activity. With only 16 EVAs, this manual process was okay, but for a much larger number, I would probably write a script to automate some of the work. Below is an example of one of these EVA summary images for EVA 4. In this one, you can clearly see the foot tracks (red) and UAV flight path (blue).
- Add UAV flight data to the maps (if applicable).
 Joe flew the Maveric UAV on EVAs 4, 13, and 14. (Check out some great video footage taken by the aircraft's onboard camera on our YouTube channel.) The UAV flight telemetry data is available in a MATLAB .m file, which made it easy to extract the aircraft's position and altitude information as a function of time. I exported the data to Excel files and used the Earth Point website to convert this into KML. I made versions both with and without the time information to either just show the UAV's flight path or show it change with time using the Google Earth time feature. As with the photos, I opened this in Google Earth along with the EVA's other relevant KML files and saved the bundle together as a new KMZ file. Download one of the KMZ files for these EVAs from their report pages and have fun exploring the UAV's flight path in 3D within Google Earth!

If you'd had enough techno babble and just want to sit back and enjoy a good show, check out this Google Earth tour of Hawaii, complete with music. You can even pretend to be a ship captain piloting a barge or cruise ship on any river or ocean here. These showcase some of the fun capabilities of Google Ocean.


Comments